J '|N)[1>V-R@(S
The Whitelist Mint is on March 10th, at 4pm PT. The Public Mint is on March 12th, at 4pm PT. And you will be able to unlock your Genesis Crates to reveal your Ultra character on March 12th, at 4pm PT. Here’s what you need to know on mint day!
Mint Phases
1
The first is for whitelisted wallet addresses. You can earn a chance to be on our whitelist by accessing our Premint via the Whitelist button. During the whitelist phase, only addresses that have been added to the whitelist can mint. Whitelisted addresses can mint a maximum of 3 NFTs.
2
The second phase is a public mint. The public mint will occur after the whitelist mint. During this phase, any wallet, even if they were not on the whitelist, can mint. Each wallet can mint a maximum of 3 NFTs.
How much will it cost?
In both phases, minting will be free, except for gas. Gas is a fee paid to the Ethereum network in order to process your request. During periods of high traffic on the Ethereum network, gas may be more expensive. However, the team charges nothing for the mint. Therefore, the only charge to you will be the gas fees you pay.
The instructions below walk through the process of minting. They apply for both the whitelist mint and the public mint.
How do I mint?
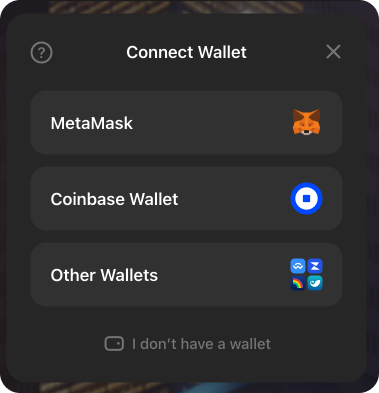
STEP 1: Connect Wallet
You’ll need a MetaMask, Coinbase Wallet, or other self-custodial wallet in order to mint. Click the “Connect” button in the top right corner, and log into your wallet of choice, following the instructions that your wallet gives you. Once you’ve successfully connected, you should see your wallet address in the same location as the Connect button previously.
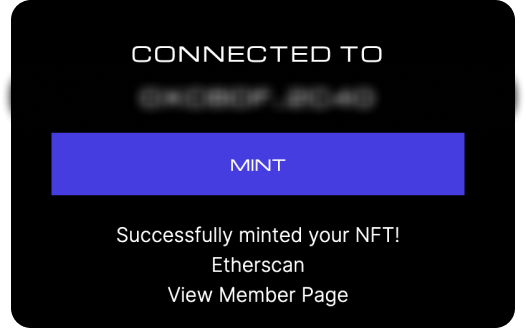
STEP 2: Click Mint
After you click the “Mint” button, your wallet will pop up with an interface for you to confirm the mint request. After reviewing the details of the transaction, click confirm on the wallet interface to continue with the minting process. We use MetaMask as an example. After you press confirm, you should see the wallet interface disappear. The “Mint” button should now read: “Minting…”

STEP 3: Success!
After a few minutes, you should see a success message confirming receipt of your character. You now access to the entire world of Forced Offline! Click on “Profile Page” to view the Genesis Crate containing your character, or continue minting more Genesis Crates. You can mint up to 3 characters per wallet. You will be able to reveal the Genesis Crates starting March 12th, at 4pm Pacific Time.
Reveal your ultra
Once you’ve finished minting, you can click “View Profile Page” with your wallet connected to see your Ultra character(s).
Before you can unveil your character, you need to first hover over the unrevealed avatar and click “Reveal”. This will open up your your wallet interface, where you can confirm that you want to go through with the reveal. This will require a gas fee. Note that the ability to reveal will only be unlocked 48 hours after the beginning of the Whitelist mint.
You can also choose to leave your character unrevealed for the time being, in order to assess its rarity by comparing it with the characters that have been revealed. If no rare characters have been revealed, then your character may be one with the rare traits!
4 weeks after the public mint, all unrevealed NFTs will be automatically revealed so that everyone has the chance to tell the story of their character.